29 March 2010

White Chocolate Mud Cupcakes

This week's cupcakes were quite a long time in the making - and very much required. You might have heard about the storms that battered Perth last Monday - it made it onto the CNN news, among other sources - which caused, via about thirty litres of water, my ceiling to end up on my floor in 3 rooms. So. My carpet has been ripped up, I have the (dry) contents of said rooms stacked up in my kitchen, and I have had builders around every day this week. That on top of working 75 hour weeks means that cupcakes are a) hard to find the time to make, but b) very much needed!

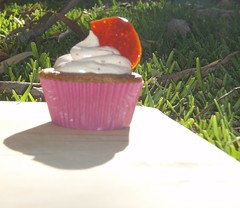
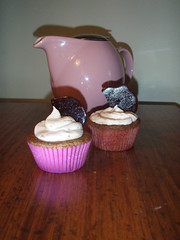
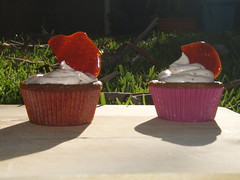
I originally intended to make a sour cream white chocolate SMBC, but I couldn't get the darn stuff to thicken. Turns out you can't use sour cream as a substitute for butter in SMBC! So I used the leftover swiss meringue to make a fluffy topping, and piped over the rest of the chocolate mixed with the sour cream. I was not impressed - but they still ended up tasting delicious. And they even stayed moist for 36 hours!

White Chocolate Mud Cupcakes - from Exclusively Food

You will need:

For the Cupcakes: (Makes 12)
225g white chocolate
150gbutter
3/4 C milk
1/2 C caster sugar
2 teaspoons (10ml) vanilla extract
2 smallish eggs, lightly beaten
1/2 C self-raising flour
3/4 C plain flour

For the Fluff:
2 egg whites
1/3 C brown sugar

For the White Chocolate Swirl:
2 Tbsp sour cream
100 g white chocolate

  1. Preheat oven to 160 degrees Celsius (145 degrees Celsius fan-forced).
  2. Line a 12 hole cupcake pan with patty pans.
  3. Place chocolate, butter, milk and sugar in a large saucepan over low heat, stirring frequently. Remove from heat when chocolate and butter have melted, and stir mixture until completely smooth. Allow mixture to cool at room temperature for 15 minutes.
  4. Add vanilla and eggs to chocolate mixture and stir until well combined.
  5. Stir flours together in a large bowl. Add one cup of chocolate mixture to the flour and stir until a smooth paste forms.
  6. Add remaining chocolate mixture and stir until mixture is smooth. This gradual method of combining the wet and dry ingredients helps prevent lumps.
  7. Pour mixture into cupcake tin.
  8. Bake for 30 minutes or until a skewer comes out clean. Allow to cool before frosting.
For the Fluff (this is just Swiss Meringue!):
  1. Over a saucepan of simmering water, whisk together egg whites and sugar until the mixture is hot (72 C) and frothy. This usually takes quite a while - 8-10 minutes.
  2. Using an electric beater, beat the egg whites until stiff peaks form and mix is cool.
  3. Pipe or spread mixture onto cupcakes.
For the White Chocolate Swirl:
  1. Stirring frequently, microwave the white chocolate and sour cream together in a bowl on medium in 30 second bursts until mixture is melted and homogenized.
  2. Pipe the mixture over the top of the fluff on the cupcakes.

28 March 2010

Gluten Free Hot Cross Buns

In the spirit of Easter, I spent most of my Saturday out looking for gluten free hot cross buns - but to no avail. Perth really struggles when it comes to GF accessibility sometimes. So I tried to make some myself!

This was the first time I've ever worked with yeast. I *think* the yeast I used was gluten free - by law, gluten content now has to be disclosed - but you could kind of tell that I'd never made anything remotely bread-like before! I couldn't find gluten free bread flour, so I used normal plain flour. I also had some issues piping on the crosses - I had my piping bag inside out (whoops!) so it didn't pipe particularly well and oozed out the bump where the seam hit the nozzle... but still. They turned out less badly than I'd thought but were still quite dense. None the less, when toasted and slathered in butter, they are well worthwhile.


Gluten Free Hot Cross Buns - based on this recipe

You will need:

110g (1/2 cup) caster sugar
2 teaspoons dried yeast
250ml (1 cup) milk (at room temperature)
75g butter, melted
1 egg, lightly beaten
600g (4 cups) plain flour, plus extra, if necessary
2 teaspoons ground cinnamon
1 teaspoon ground nutmeg
1/2 teaspoon ground ginger
1 1/2 C dried fruit (I used dried cranberries)
1 tsp salt

2 tsp milk, for glazing

for the crosses:
1/2 C plain flour
2 tsp sugar
1/3 C water
  1. In a small bowl, combine a large pinch of the sugar with 125ml (1/2 cup) body temperature water, then sprinkle yeast over it. Stand mixture in a draught-free place for 7 minutes or until it becomes foamy.

  2. Combine yeast mixture in a large bowl with the milk, butter and egg and stir to combine well.

  3. Add flour, spices, dried fruits and 1 teaspoon salt, then stir until combined and a coarse dough forms (it may be necessary to use your hands).

  4. Turn dough out onto a lightly-floured surface then, using your hands, knead dough for 10 minutes or until smooth and elastic, adding a little more flour if dough is sticky. Take care not to add too much extra fl our or buns will be heavy.

  5. Place dough in a large, greased bowl, turning to coat, then cover with plastic wrap and leave in a draught-free place for 1-1 1/2 hours or until doubled in bulk.

  6. Using your fist, gently punch dough down to deflate. Turn dough out onto a lightly-floured surface, pat into a rough round shape, then ask an adult to cut into 12 even-sized pieces with a large, sharp knife.

  7. Roll each piece into a ball then place, 6cm or so apart, on a greased tray.
    Cover loosely with a kitchen towel and stand in a draughtfree place for 1 hour or until doubled in size. Grease base and side of one 58x30cm (or base and sides of two 29x16cm) baking dish(es) and pre-heat oven to 200°C.
    Using a metal spatula, and taking care not to deflate buns, place in dish(es), spacing them evenly apart. Brush surface of the roll with milk.

  8. For crosses, combine flour and 80ml (1/3 cup) water in a small bowl and stir until smooth and combined. Place mixture in a piping bag fitted with a small, plain nozzle and pipe a cross shape over the top of each bun. Bake for 20 minutes (mine took 40), or until golden and risen, then turn out onto a wire rack and allow to cool.

27 March 2010

Cupcake Hero - Caramel Strawberry Cupcakes - Update!

So... I was checking out the latest update from I Heart Cuppycakes - and (god bless her) getting the latest on the Cupcake Hero throwdown. Turns out I was the lucky Baker's Choice Challenger for the Caramel throwdown!

*insert music from Rocky here*

C'mon little Strawberry Caramel Cupcake... work your magic baby!

21 March 2010

The Search for the Perfect Gluten Free Vanilla Cupcake - Update!

So, for quite some time now, I've been looking for the Perfect Gluten Free Vanilla Cupcake. I've had a few struggles along the way - such as last week's debacle - but I have finally moved in the right direction with Exclusively Food's Vanilla Cupcakes. Light, fluffy and subtly sweet, these cupcakes are moist - and ironically, are almost identical to my favourite cupcake recipe, Salted Caramel Cupcakes (but without the brown sugar) which manage to keep for a good 3 days!

In the words of Rex Harrison - By George, I think she's got it!

I just bought my very first piping bag, and have done an absolutely terrible job with the piping - please forgive the appalling piping job! These cupcakes look like something out of a Dr. Seuss book (you can eat them on a log; you can eat them with a dog) but taste amazing.

Exclusively Food's Vanilla Cupcakes

You will need:

125 g butter (room temperature)
2/3 C caster sugar
1 tsp vanilla
2 eggs
1 1/4 C self raising gluten free flour
1/2 C milk
  1. Preheat the oven to 180 C. Line a 12 hole cupcake tin with cupcake cases.
  2. Cream butter and sugar together until pale. Beat in vanilla.
  3. Beat in 1 egg. Scrape down the sides. Beat in the second egg and scrape again.
  4. Mix in the flour in 3 additions, alternating with the milk in 2 additions, mixing continuously.
  5. Divide evenly into cupcake cases. Bake for 20-25 minutes or until a skewer comes out clean.
  6. Cool on a wire rack.
Vanilla SMBC

You will need:

3 egg whites
1/2 C sugar
125 g butter
2 tsp vanilla extract

  1. In a large, clean heatproof bowl, combine the egg whites and sugar. Set the bowl over (but not touching) simmering water in a saucepan and heat the mixture, whisking constantly, until the sugar has completely dissolved and the mixture is very warm to the touch. Remove the bowl from the saucepan.
  2. Using an electric mixer on high speed, beat the egg white mixture until it is fluffy, cooled to room temperature, and holds stiff peaks (the mixture should not look dry), about 6 minutes.
  3. With the mixer on medium-low speed, add the the butter, a few pieces at a time, beating well after each addition. If the icing appears to separate or is very liquid after all the butter is added, continue to beat on high speed until it is smooth and creamy, 3-5 minutes more. Add the vanilla extract scraping down the sides of the bowl as needed.

I've figured out that the big issue is the fat:flour ratio. I'm not sure why the additional fat helps prevent the cakes from going stale, but I've been having a bit of a think about what's going on...

Now this is just some guesswork based on how I know xantham gum and gluten behave chemically... [Beware - sciency bit coming up] In normal cupcakes, the gluten creates a lattice, helping trap the water molecules and preventing them evaporating, leaving them moister for longer. Over time, the water can migrate through the lattice, making the cakes eventually go stale. In gluten free cakes, there a) is no gluten lattice to help trap the cupcakes, and b) the xanthan gum is more soluble in water, meaning that a lattice isn't formed until a later stage during the baking. Adding additional fat a) simulates the moist mouthfeel, and b) helps retain the moisture by forming emulsions (the xantham gum also acts as an emulsifier - or at least, I think it would...). Or I could be completely wrong. Meh - either way - fixing the fat:flour ratio makes a huge difference.

Edit: The Next Day Verdict

As I predicted, these cakes were just lovely the next day. And even - believe it or not - the day after! These cakes were delicious right up until they were all gone - I was incredibly impressed.

14 March 2010

Vanilla High Hat Cupcakes

Woo! Finally back in the game. Have had a rather horrendous week - I've had a horrible bout with the flu (and then a sinus infection from hell) that has kept me in bed until, well, yesterday. And nobody wants to eat fluey cupcakes.

So today marks the first cupcakes in a fortnight - and in the pursuit of the perfect vanilla cupcake, I used the Women's Weekly Little Pies and Cakes Patty Cakes recipe I discussed in this post.


Vanilla High Hat Cupcakes

You will need:

For the cupcakes:
125 g softened butter
3/4 C caster sugar
1 tsp vanilla extract
3 eggs
2 C self raising flour
1/4 C milk

For the swiss meringue:
3 egg whites
3/4 C sugar
boiling water

For the chocolate (aka the chocolate pit of death):
200 g milk chocolate
1 Tbsp oil (I used olive but you can use whatever you have - canola or vegetable is fine)
  1. Preheat oven to 180 C and line a 12 hole cupcake tin with patty cases.
  2. Mix together cupcake ingredients using an electric beater (I beat the butter and sugar together first, then added the vanilla, eggs, flour and milk in that order).
  3. Bake for 25 minutes on 180 C or until a skewer comes out clean. Allow to cool for 5 minutes in the tray, then tip upside down onto a wire rack to cool.
  4. Using a double boiler, (i.e. over a pot of boiling water) whisk meringue sugar and egg whites together until the mixture reaches 70C.
  5. Using an electric beater, beat the egg whites and sugar until mixture is thick and firm and stiff peaks form (it should look nice and glossy).
  6. Allow meringue to cool - if it softens, beat until it firms back up.
  7. Pipe meringue onto cooled cupcakes.
  8. In a deep glass wide enough to admit the cupcakes, melt the chocolate by microwaving on medium for 10-20 second bursts. Stir after each heating.
  9. Add the olive oil into the chocolate mix and stir (really well!) until fully combined.
  10. Lay down some paper towel where you will be working - this does get messy!
  11. Dip the meringue on the cupcakes gently into the chocolate - holding the cupcakes by the base makes this easier. Try to shake off as many drips as you can without knocking any meringue into the mixture.
Horror stories abound about the entire top falling off the cupcakes while dipping into the chocolate pit of death - this is not something to attempt lightly. Or cleanly. Accept the fact that whatever you are wearing - plus your face and hands - will end up absolutely covered in chocolate. Then move on - because it's worth it! Chocolate high hats are so pretty and they really give your cupcakes that little bit of extra oomph.

The actual cupcake recipe was pretty disappointing though - less than 6 hours after baking, they were completely dry and stale. Ugh - what a waste of ingredients.

Edit - The Next Day Verdict
So I brought the cupcakes into work the next morning - while the high hat itself was still lovely and well received, the cupcake was described as 'Saddam's lost weapon of mass destruction' - and that was one of the more complimentary adjectives! So yeah - verdict for the high hat process is a big thumbs up - but don't even bother with the cake recipe.

08 March 2010

The Search for the Perfect Gluten Free Vanilla Cupcake

I know this is hardly groundbreaking stuff - the Perfect Vanilla Cupcake is pretty much the holy grail of cupcake making. It is somewhat complicated by the fact that it is gluten free, since the gluten free flour tends to absorb moisture at a different rate than normal flour; the result of which is that the cakes tend to have a 12 hour shelf life before they start to go stale. Not ideal.

Most people I know (who are so inclined to think of cupcakes in that way and have been to NY) swear by the Magnolia Bakery Vanilla Cupcake recipe. Not so when they're gluten free - they're lovely if you manage to eat them within 12 hours of taking them out of the oven; but leave it any longer than that and you may as well treat yourself to a lovely vanilla hockey puck. (Yum.)

So - I'm in search of recipes. Specifically, your favourite vanilla cupcake recipe. Please (pretty please with a cherry on top!) reply to this post with either a link to your favourite vanilla cupcake recipe, or a copy of the recipe itself.

Here are the ones I am planning on trying thus far:

Taste.com.au's Classic Vanilla Cupcakes
Women's Weekly Little Pies and Cakes Patty Cakes with Glace Icing
Exclusively Food's Vanilla Cupcake Recipe
HTEAC's White Velvet Cupcakes

Any other suggestions?

05 March 2010

For when you're not at your best...


The gods are clearly smiling on me at the moment - have come down with a few nasty ailments and am stuck in bed for at least the next 3 days. Fun times.

So. Some recipes that are soooo incredibly easy to whip up (even when you feel like death warmed up) and are delicious, nutritious and comforting.


Chicken and Veg Noodle Soup

1/4 C frozen peas (or fresh peas if you can get them)
1/4 C fresh mushrooms
1 chicken stock cube (or fresh chicken stock)
1 C boiling water
1/4 small packet rice noodles

Large mug
Microwave
  1. Place peas and mushrooms in mug. Crumble stock cube over the top. Pour boiling water over the vegetables and stir until the stock cube is dissolved.
  2. Microwave on high for 30 seconds.
  3. Stir the stock with the noodles until they soften and can fit into the mug.
  4. Microwave on high for 2 minutes.
  5. Enjoy and get better!

03 March 2010

The Sad Demise of My Laptop

Unfortunately, on Monday my beloved laptop of 7 years had a bit of an accident and, to cut a long story short, is no more. It's too old to get fixed (sad) so I've had to go and buy a new one (which I'm still figuring out - I can't say Windows 7 has grown on me much yet, but I dare say I'll learn!).

Establishing the nuances of the computer, combined with working 12 hour days (as I have for every day this week) doesn't leave an awful lot of time for cooking or blogging, so please forgive me if posts are somewhat sparse in the next 48 hours or so.

But I promise I'll be back to full strength soon - with more recipes and photos, of both the lazy and cupcakery variety!

02 March 2010

IC:E - Vote Now Open

As you know, this month I steeled myself to submit 2 IC:E entries for the Passion themed contest - Fig & Honey and CranOrange Meringue. Voting is now open here - please click and vote for whichever was your favourite (or indeed, both if you are feeling generous and lovely!).

Fig & Honey Cupcakes - Entry 1
CranOrange Meringue Cupcakes - Entry 2

01 March 2010

Cupcake Hero - Caramel Strawberry Cupcakes

As a kid, one of my favourite caramel lollies was strawberry toffee. These cupcakes were inspired by that lolly - and are my first ever cupcake hero entry.

The cake recipe was borrowed from How to Eat a Cupcake (God bless her!); the buttercream and tuille recipes are my own creations.

Caramel Strawberry Cupcakes You will need:

1 1/4 cups all-purpose gf flour
3/4 tsp gf baking powder
1/4 tsp salt
1 cup firmly packed dark brown sugar
1/2 cup granulated sugar
125 g unsalted butter, at room temperature
2 large eggs, at room temperature
1 tsp vanilla extract
1/2 cup whole milk

Strawberry Buttercream
2 large egg whites, at room temperature
1/2 cup brown sugar
Pinch salt
125 g unsalted butter, cut into cubes (at room temperature)
2 Tbsp strawberry jam

Toffee Tuille
1/2 cup sugar
1 Tbsp butter

3 bowls
electric beater
scraper
saucepan
measuring jug + spoons
wooden spoon
wire cooling rack
muffin tin and pattypans
baking paper
flat tray


For the cupcakes:
Position a rack in the middle of the oven and preheat to 180°C. Line a standard 12-cup muffin pan with paper or foil liners.

In a bowl, whisk together the flour, baking powder and salt. In another bowl, using an electric mixer on medium-high speed, beat the sugars and butter together until light and fluffy, 2-3 minutes. Add the eggs and vanilla and beat until combined. Add flour mixture in 3 additions, alternating with the milk in 2 additions, beating on low speed until just combined; scrape down the sides of the bowl as needed.

Divide the batter evenly among the prepared muffin cups, filling each about two-thirds full. Bake until a toothpick inserted in the center of a cupcake comes out clean, 20-22 minutes (Mine were done at 40 minutes). Let the cupcakes cool in the pan on a wire rack for 5 minutes. Transfer the cupcakes to the wire rack and let cool completely, about 1 hour.
Strawberry Buttercream

In a large, clean heatproof bowl, combine the egg whites and sugar. Set the bowl over (but not touching) simmering water in a saucepan and heat the mixture, whisking constantly, until the sugar has completely dissolved and the mixture is very warm to the touch. Remove the bowl from the saucepan. Using an electric mixer on high speed, beat the egg white mixture until it is fluffy, cooled to room temperature, and holds stiff peaks (the mixture should not look dry), about 6 minutes.

With the mixer on medium-low speed, add the salt and the butter, a few pieces at a time, beating well after each addition. If the icing appears to separate or is very liquid after all the butter is added, continue to beat on high speed until it is smooth and creamy, 3-5 minutes more. Add the strawberry jam, scraping down the sides of the bowl as needed.
Toffee Tuille

Line large, flat tray with baking paper. Melt 1/2 cup sugar in a saucepan on medium heat. When it has turned golden brown, add 1 Tbsp butter - it will froth a bit so be careful! As soon as the butter is melted, spoon toffee onto baking paper and allow to set. Break into 12 even pieces.

Top the cooled cupcakes with the buttercream and tuille. Delish!